TL;DR - Build your First Pepa
| AI Assisted |
Here’s the path we’ve taken — and are still traveling (updated Jul-2026), because we’re maybe a third of the way up a very long ladder and nothing is permanently settled. Each step below shows two things: the affordable rung we started on, which remains a valid starting point for you, and the gear we’ve evolved to after a year of blood, sweat and painful $ mistakes.
Don’t let our current hardware scare you; we didn’t start there and neither should you. Climb at your own pace and budget — you can stop at any rung and still have something useful. Detailed docs are in progress which will expand on these topics. Read it slowly, there’s a lot to unpack here because this is not written for newbies. Meantime please document your own work to compare notes with us.
N.B. All the specific brands/models mentioned below are our current operational choices but you make your own. They’re listed for your shopping convenience and were purchased out of our own pocket. Painful $ mistakes were made so think carefully when sourcing stuff to make substitutions. We shopped at Amazon, eBay, FB Marketplace, Best Buy and locally. There are no affiliate links so Google them up and find the deals.
This is real and working. See pictures at the bottom.
0. Foundation (Network) Mandatory
Section titled “0. Foundation (Network) ”You need a stable home network.
- Internet + WiFi is the minimum
- A wired network is strongly recommended:
- min 1Gb/s, 2.5Gb/s preferred - no need for 10G
- with VLANs, you’ll need them to channel and prioritize traffic. Make sure you have a true L3 hardware router or OPNsense, which we run on a Protectli Vault V1610 (skip coreboot use AMI BIOS) (overkill but got at good price, many 2-NIC i3 mini PC’s will do). An L2/quasi-L3 switch alone isn’t enough, don’t believe the hype. Don’t waste time on routers-on-a-stick unless you can’t afford better; if so, Raspberry Pi’s are good for that.
- get multi-SSID, SSID-to-VLAN mapping WiFi access points because you will need multiple SSID’s (main, guest, IoT, cameras). We run two used Grandstream units (GWN7664 in the hallway, GWN7662 in the laundry), each powered over its ethernet run by a PoE injector and trunked to the backbone switch, broadcasting five SSID’s mapped to their VLANs. Before that we made do with used, cheap enterprise gear (Engenius EAP300, Cisco WAP4410N) — still a valid path if the budget is tight, just older security and no PoE conveniences.
- if you use consumer gear (e.g. WiFi 5/6/7 all-in-ones like a TP-Link Archer in access point mode) then you’ll need a small L2 managed switch (e.g. Sodola SL902-SWTGW215AS) to tag it to a VLAN. That’s how we started; the dedicated multi-SSID APs replaced it.
- For IoT devices, rely on WiFi (2.4GHz, on its own VLAN) and Zigbee. Matter/Thread are not mature as of 2026 — don’t build your foundation on them yet.
Pepa is infrastructure. If the network is flaky, everything else is noise.
1. Sensory Base (Home Assistant) Mandatory
Section titled “1. Sensory Base (Home Assistant) ”Install Home Assistant on a dedicated machine.
- Any used NUC-class mini PC will do (i5 or better, 8GB+ RAM); don’t waste time/money on Raspberry Pi unless you’re going to use GPIO
- Run HAOS as an appliance — bare metal or a VM — it’s faster, more resilient and easier to manage than the Docker/supervised route
- Start integrating inexpensive sensors (motion, door, power, switches, etc.)
- Use widely available devices (IKEA, Zigbee, WiFi)
- Important Configure/wire the devices so that the house keeps working even if the network is down. Must always have manual control of the house.
What we run now: HAOS as a UTM virtual machine on a Mac mini M4, sharing the box with the speech and local LLM services you’ll meet in steps 2–3. We started on a NUC7i5 — that box is still in service, just reassigned to experiments. Consolidating onto one efficient machine cut watts and cables, which matters at Puerto Rico electricity prices.
Without sensory input, Pepa is blind and Home Assistant is an excellent platform for that.
2. Sensory Intelligence Layer (Home Agent app) Mandatory
Section titled “2. Sensory Intelligence Layer (Home Agent app) ”To make the sensory arm semi autonomous, install the Home Agent app (formerly called add-on) through HACS on Home Assistant:
- Connect to an online LLM (to start) — cheap, fast to set up, and fine for learning what an LLM-driven home even feels like
- Begin experimenting with automations + LLM intent interpretation
- Optionally install an MCP server app so it can be controlled by Pepa’s higher functions or other apps like Claude (non-deterministic, dangerous!)
What we run now: Our development version of Home Agent is called “Pepa Sensory Arm” and points at a small local model (Gemma-class, ~4B) served by Ollama on the same Mac mini as Home Assistant. No cloud, no per-token bills, and everything keeps working when the internet doesn’t. Getting a small model to behave is taking real harness work (that’s a story for the detailed docs), but the hardware ask is modest: it fits in the same box you already bought. Bigger inference jobs are handled by our Mac Studio.
This completes the sensory arm where raw signals start becoming meaning. You can stop here and enjoy an excellent, smart home automation system without further development work, just maintenance, but without Pepa.
3. Voice Interface (Optional but Important) Interface Expansion
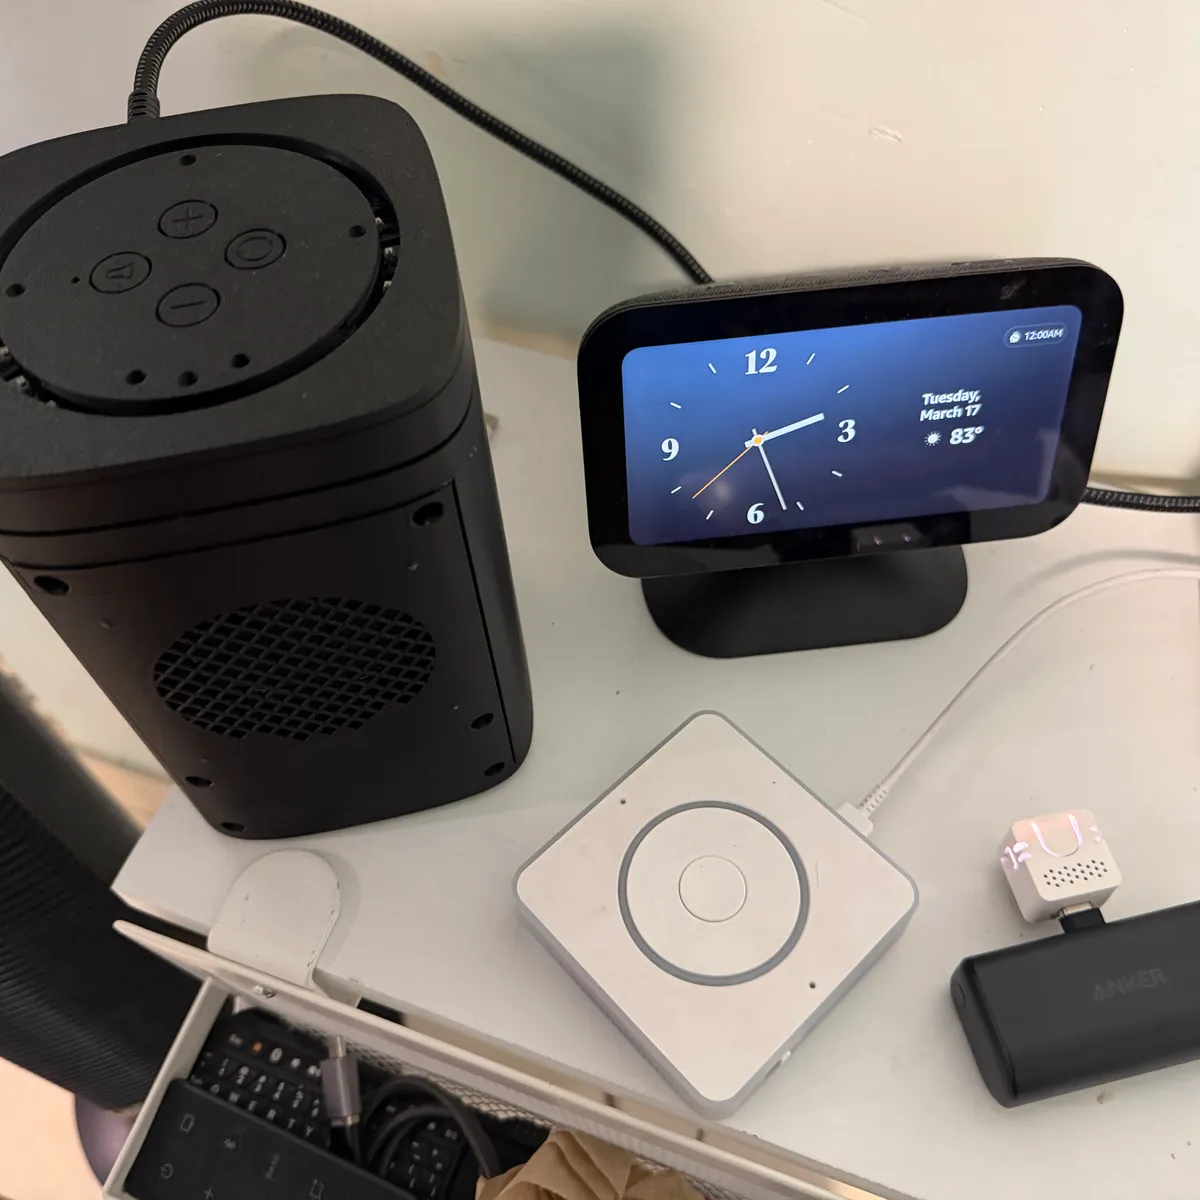
Section titled “3. Voice Interface (Optional but Important) ”Add a voice satellite (picture at the bottom)
- M5Stack Atom Echo (cheap starter, barely audible but very portable so it can cosplay as a Federation combadge or any other senior friendly wearable)
- Home Assistant Voice Preview Edition (official Nabu Casa gear, better h/w 2-mic/louder speaker)
- FutureProofHomes Satellite1 (“high end” circuit - 4-mic, 20W amp, presence+ambient sensors). Requires ESPHome & coding knowhow and additional 3D printed enclosure + audiophile quality speaker + assembly. This is the type needed for unintrusive monitoring of the senior.
- Run bilingual Whisper STT and Piper TTS. Start with the versions installable inside Home Assistant — good enough to learn on.
- A custom wake word is worth the effort for identity and senior familiarity. Pepa’s micro wake word is “Oye Pepa!” (phonetically “oieh_pepaah”). We got a basic one working today but are still collecting training samples for the final one.
What we run now: Whisper (large-v3-turbo) and Piper run as always-on background services on the same Mac mini, accelerated by Apple Silicon — no GPU tower needed. We first ran them on a gaming laptop with an NVIDIA card under Windows; it worked, but the power bill and the fan noise retired it. Bonus we didn’t plan for: the same voice pipeline reaches the car — iPhone connects home over VPN and Pepa talks through the car speakers via CarPlay.
Voice is not typing. It will break things. That’s the point.
4. Storage Node (Persistence) Capability Expansion
Section titled “4. Storage Node (Persistence) ”Set up a NAS or some other network storage solution.
- SMB and S3-style storage for all your data; skip the fancy distributed filesystems (Ceph, etc.) — that’s costly complexity you don’t need and won’t want to maintain
- Run auxiliary processes on it, but lightly
- Don’t overload the NAS with non-Pepa data and apps, get a 2nd one for that
What we run now: A TerraMaster F4 SSD — all solid state, so it sips power and makes no noise. Besides file duty it hosts Proxmox Backup Server (which backs up everything in step 5) and a Jellyfin media server, and that’s as loaded as we’ll let it get. Persistent storage is one place where we started at the rung we’re still on.
Persistent, reliable storage is the key to Pepa’s longevity and usefulness.
5. Cognitive Backend (Local Compute) Capability Expansion
Section titled “5. Cognitive Backend (Local Compute) ”Set up a small server with Proxmox VE — any used mini PC with 16GB+ RAM will do. Do not go crazy setting up clusters that you don’t know if you’ll need; minimize complexity.
- Run your databases here, each in its own lightweight container
- Add vector storage (Home Agent’s ChromaDB)
- Begin experimenting with orchestration (LangGraph, your own Python code, etc.)(You can also try your luck at prompt engineering)
- Other supporting services as you accumulate them (UPS monitoring, MQTT, DNS, inventory, task tracking, etc.)
What we run now: Proxmox on a used Intel-era Mac mini — cheap, silent, low-watt, and happy running a stack of unprivileged containers: ChromaDB (the sensory arm’s working memory), NUT for the UPS, a serial-over-network bridge that lets the Zigbee radio live anywhere, and a few quality-of-life apps. We tried PostgreSQL+pgvector for long-term memory and parked it; the design we’re building toward is SurrealDB, one engine that does graph, vector & metadata together. That work is in progress — memory is the hardest arm, and the detailed docs will show the scars.
These are Pepa’s vital organs, and where memory starts to exist outside HA for all arms to access.
6. Heavy Compute (LLMs) Capability Expansion
Section titled “6. Heavy Compute (LLMs) ”Choose your path:
- Cloud: API-based LLMs — the cheap start. No hardware to buy, but your household’s words leave the house. Fine for learning, wrong for the mission.
- Local:
- Apple Silicon with as much unified memory as you can afford, or
- an nVIDIA GPU box (mind the power draw — see the gaming laptop lesson in step 3)
- Experiment with Ollama, LM Studio, llama.cpp, MLX, CUDA, pure Python, etc.
What we run now: A used 2022 Mac Studio M1 Ultra with 64GB of unified memory, serving larger models via Ollama and MLX. The choice was mostly about electricity: it idles near zero, spikes for inference, and goes back to sleep — an always-on brain a Puerto Rico power bill can live with. This box is not “the boss”; it’s hired muscle. When the small model in step 2 hits something too heavy, the harder question gets routed here.
Heavy compute is the reasoning muscle and determines how smart, independent — and private — your Pepa becomes. The Head that decides who does what is orchestration software, not hardware — that story is still being written.
7. Separation of Concerns (Highly Recommended) Operational Maturity
Section titled “7. Separation of Concerns (Highly Recommended) ”Keep your system stable:
- One HA instance for the house — production, stable, boring on purpose
- Experiments live on separate hardware. A second HA instance, a spare mini PC, a Proxmox container — whatever you can afford, as long as breaking it can’t break the house
- Disaster recovery is part of the job: automated backups of every VM/container, and a UPS so brownouts don’t corrupt anything (hurricane country here; your threat may be winter storms — same discipline)
- Other hardware/software deployments as needed.
What we run now: The production sensory arm lives alone on its Mac mini and nobody experiments on it. Everything speculative — new agents, new memory designs, new harnesses — runs quarantined on the Proxmox nodes, including the NUC that used to be our main HA box, now demoted to lab rat. Proxmox Backup Server snapshots every container nightly to the NAS, and a UPS rides through the power blinks that Puerto Rico’s grid generously provides for testing purposes.
If you break Pepa, your house should still work.
What You Get at the End
Section titled “What You Get at the End”If you followed this blueprint, you will have:
- A resilient infrastructure (easy to maintain and upgrade)
- A sensory system (Home Assistant + devices)
- A perception layer (Home Agent + a local LLM)
- A voice interface (portable and fixed)
- A memory backend (databases + vectors today; the graph design is in the works)
- A reasoning muscle (local or cloud AI, your privacy call)
- A safe playground (separate test environment, so the house never pays for your experiments)
That’s a minimal, working Pepa scaffold — the first third of the ladder, which is exactly where we are. The very first Pepa runs in our house today and it needs lots more work.
The rest is up to you, so go for it and let us know.
Email your comments to the editor
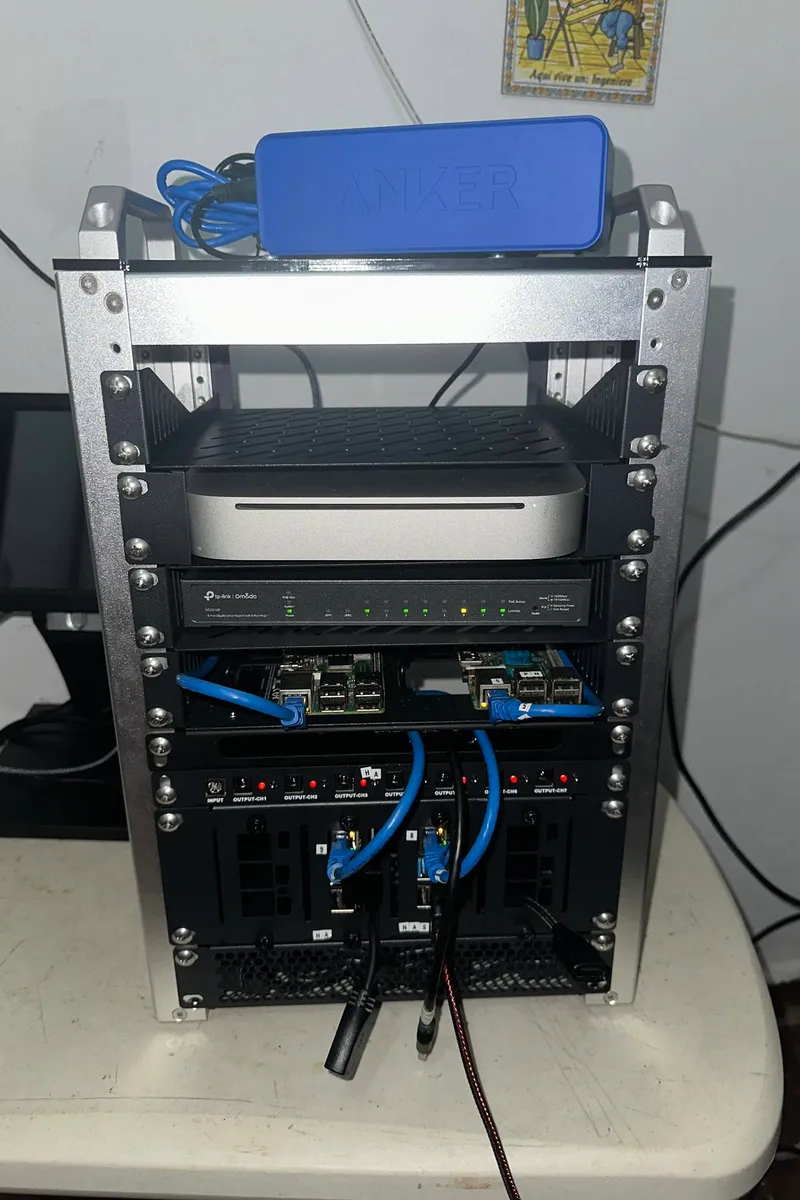
Pictures
Section titled “Pictures”Pepa’s rack, rung by rung. Same mission, evolving hardware — proof you can start small.
Jul-2026 — Current state.
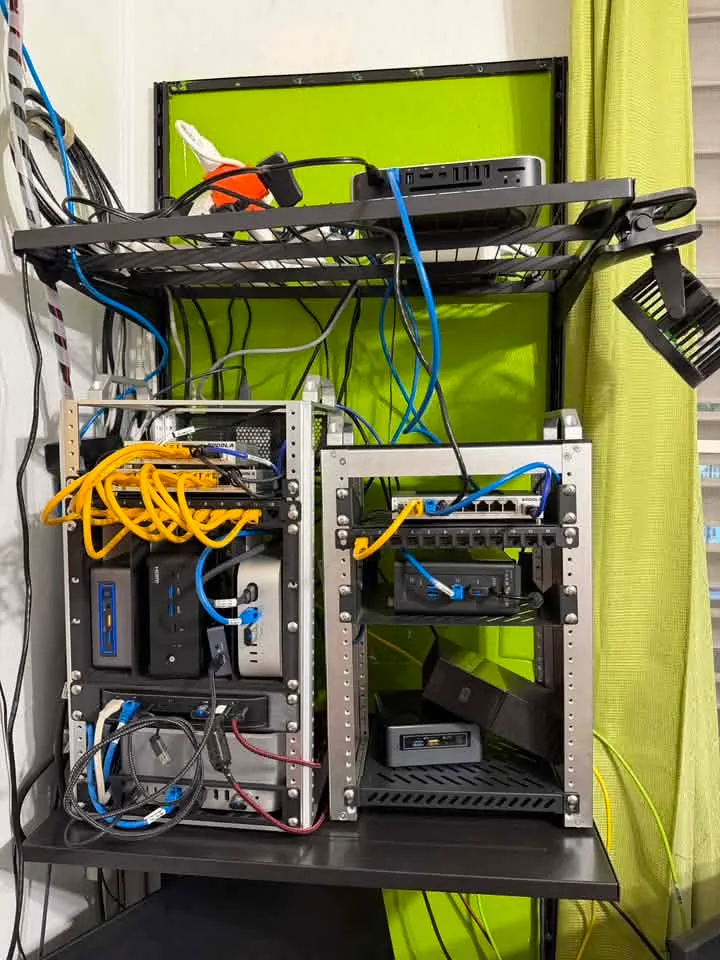
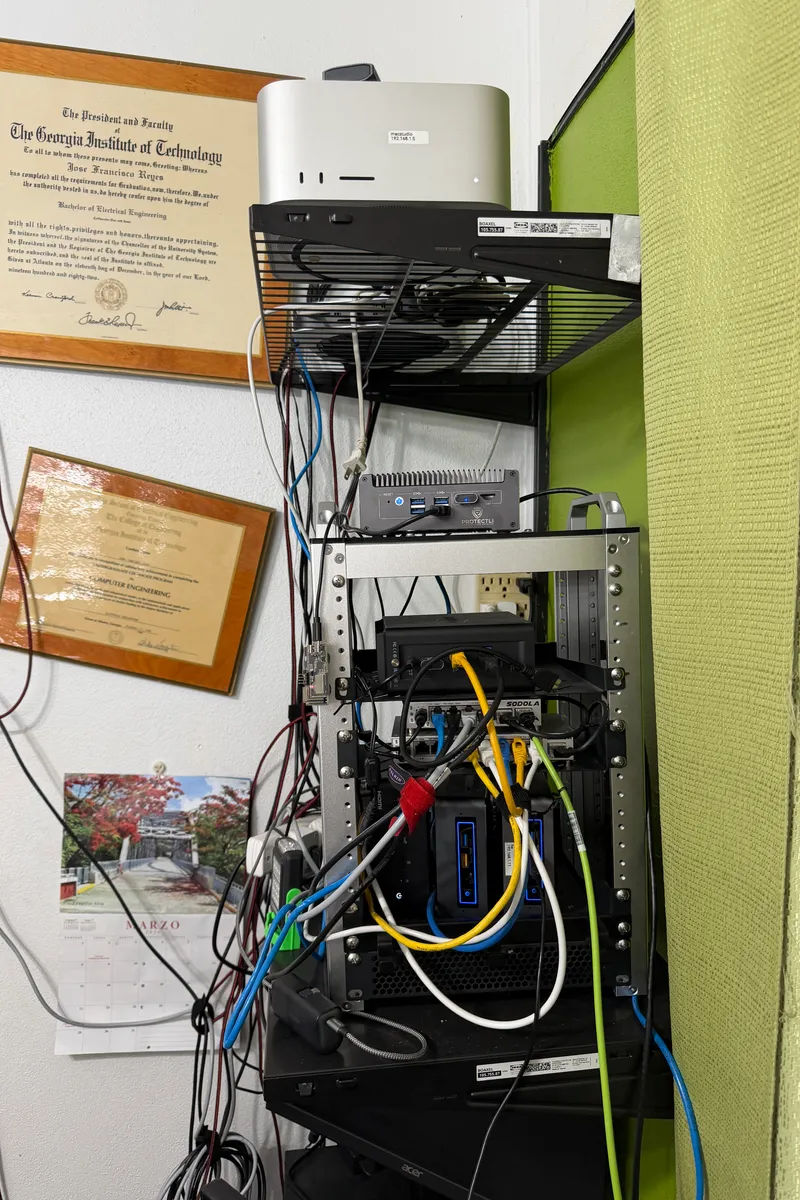
Mar-2026 — Minirack v3: first fully working Pepa scaffold.
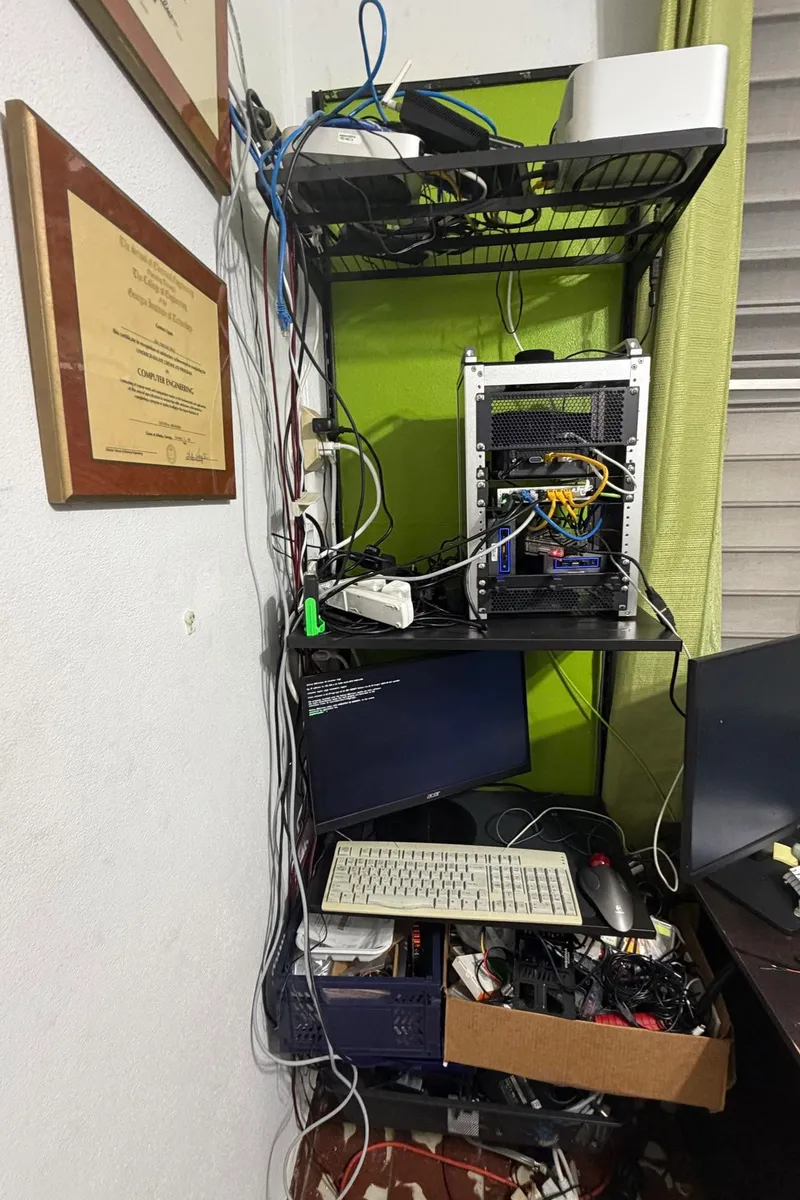
Dec-2025 — Minirack v2: NAS & Mac Studio added but HA running on NUC7i5, no OPNsense and no Proxmox.
Jun-2025 — Minirack v1: Raspberry Pi’s, a Mac mini 2010 and hope.
The voice satellites, plus an Amazon Echo Show 5 with Alexa+ as benchmark and goal — when we dump (maybe reflash?) it, that means Pepa is ready for its mission.